LEFT AND RIGHT
LEFT TO RIGHT ORIENTATION
Training eyes to move from left to right and then reverse sweep is a key to beginning reading and writing. A simple, yet powerful way, that teachers can do this is through modeling. Make it a habit to sweep your hand from left to right under words or lines of print on charts, big books, white boards, and so forth.
Right & Left Song
(Tune: “Up on the Housetop”)
Here is my right hand way up high.
(Hold up right hand.)
Here is my left hand touch the sky.
(Hold up left hand.)
Right and left and roll out of sight.
(Roll hands around.)
Now I know my left and right.
(Hold up left and then right.)
Note! The teacher must reverse hands or turn around backwards so children will see the correct hand.
Sticker - Put a sticker on each child’s right hand and then play “Simon Says” or the “Hokey Pokey.”
Bracelet – Make a bracelet from a pipe cleaner or strip of paper and attach to the right hand. Touch your bracelet to your right ear…right leg…right foot…right knee.
Pledge Hand – Trace around your right hand, cut it out, and tape it on the wall near the flag. Have children match their right hand visually to the hand by the flag before placing it on their heart.
Lotion - Rub lotion or scented lip balm on each child’s right hand.
Hint! If you focus on the right hand, then what is leftover is always their LEFT!
Poem - Hold up your hands and stick out thumbs and index fingers as you say:
Which is my left? Which is my right?
Sometimes it’s hard to tell.
But when I stick my thumbs out straight,
My left will make an “L."
LEFT TO RIGHT ORIENTATION
Magic Fingers – Have children hold up their pointer and explain that it is their “magic finger” to help them read. Put a little spritz (magic lotion) on their finger. Use the finger to touch the front of the book and the back of the book. Touch the top of the page and the bottom of the page. Sweep your magic finger under each line from left to right.
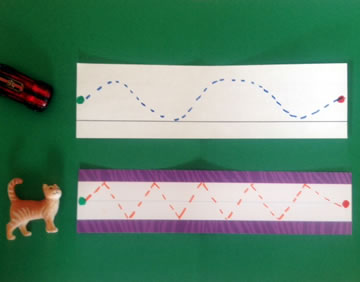
Animal Trails – Draw tracks on sentence strips similar to the ones shown. Children can drive cars or move animals from left to right.
Hint! Make a green dot where they are to begin and a red dot where they should end.
“Eye” Pointers – Glue wiggly eyes to craft sticks. Let children use these to keep their “eye” on words and track print from left to right.
Finger Pointer – Glue a fake fingernail to a craft stick. What an engaging way for children to track print from top to bottom and left to right!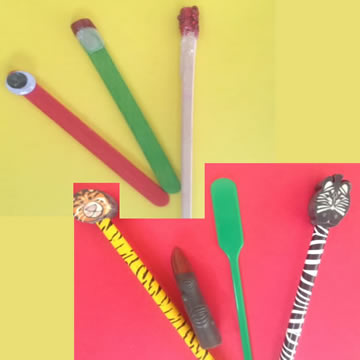
Yummy Pointers – Give children Bugles to put on their fingers to practice following a line of print. They can eat them when they are finished.
•Pretzel sticks also make edible pointers.
Magic Wands – Dip the end of a chopstick into glue and then roll in glitter. Dry. Children can use this to track print and identify words, letters, punctuation, and other details.
Teacher Treasures – Keep a plastic cup on your desk or reading table with seasonal pencils, drink stirrers, and other objects that will entice children to track from left to right.
Walking Pencils – Draw a green line vertically down the left side of a sheet of paper. Draw a red line down the right side. Give children pencils or crayons and have the practice “walking their pencil” from the green line to the red line. 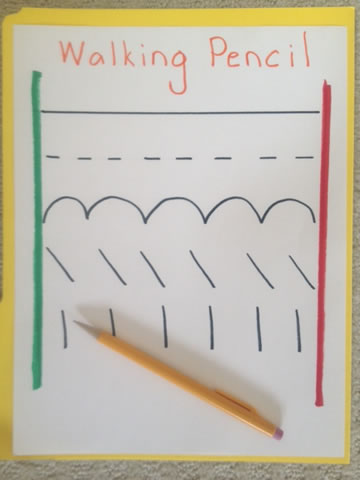 Remind them when they get to the red line they must stop, pick up their pencil, and go back to the green line. Their pencil can walk (long horizontal line), skip (short horizontal lines), hop (curves up and down), gallop (slant), stomp (vertical line), etc.
Top to Bottom Song (Dawna Hunter)
(Tune: “Head, Shoulders, Knees and Toes”)
Top to bottom,
Left to right.
Top to bottom,
Left to right.
My mind knows that writing always goes
Top to bottom,
Left to right.
Next Page